Google Drive can become messy without you noticing.
A few PDFs stay in the wrong place.
A school or work file gets saved without a clear name.
Shared folders appear from other people.
Old screenshots, forms, and downloads pile up.
Before long, your Drive feels like a digital junk drawer.
The good news is that you do not need to clean everything at once.
You do not need a perfect system.
You need a simple step-by-step cleanup that makes your files easier to find and easier to manage.
This guide will show you how to clean up Google Drive in a calm, practical way.
First, Do Not Start by Deleting Everything
When Google Drive feels messy, it is tempting to delete files right away.
That can create stress.
You may not know what a file is.
You may worry it is important.
You may accidentally remove something you still need.
Start by organizing first.
Move obvious files into clear folders. Rename important documents. Check what is taking up space. Delete only when you are confident.
This matters because the goal is not to make Drive look empty.
The goal is to make Drive easier to use.
Understand What Uses Google Storage
Before cleaning, it helps to understand where your storage is going.
Google storage is shared across Google Drive, Gmail, Google Photos, WhatsApp backups, and other Google account storage areas. When the account is full, it can affect more than just Drive.
This matters because deleting a few small documents in Drive may not solve a storage problem if most space is being used by photos, videos, email attachments, or backups.
A cleanup should focus on two things:
Making files easier to find.
Freeing space where it actually matters.
Those are related, but they are not exactly the same.
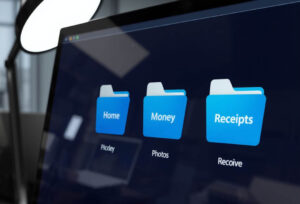
Step 1: Create a Simple Main Folder System
Start by creating a few clear folders in Google Drive.
Do not make too many.
A good beginner structure could be:
- Personal Documents
- Photos and Videos
- Home
- Money
- School or Work
- Receipts
- Shared Files
- To Sort
- Archive
This matters because most messy Drives do not need more effort.
They need fewer decisions.
When every file has a clear place to go, cleanup becomes easier.
For example:
A tax document goes in Money.
A rental agreement goes in Home.
A class assignment goes in School or Work.
A receipt goes in Receipts.
An unclear file goes in To Sort.
Simple categories are easier to maintain than complicated ones.
Step 2: Use “To Sort” as a Temporary Folder
Create a folder called To Sort.
Use it for files you cannot organize quickly.
This is helpful for:
Unclear PDFs
Random downloads
Files with confusing names
Documents you need to review later
Items you do not want to delete yet
This matters because not every file deserves a decision right now.
If you stop to inspect every old file, the cleanup may take hours and feel overwhelming.
A To Sort folder lets you keep moving.
But it needs one rule:
To Sort is temporary.
Review it once a week or once a month so it does not become another messy folder.
Step 3: Clean “My Drive” First
Start with My Drive, not every shared folder.
My Drive is the main area you control. It is usually the best place to begin because it contains the files and folders you have added or created.
Look at the first screen of files and folders.
Move only the obvious items.
Examples:
Move Lease 2026.pdf to Home.
Move Budget.xlsx to Money.
Move Math Notes.docx to School or Work.
Move Amazon Receipt.pdf to Receipts.
Move unclear files to To Sort.
This matters because visible clutter makes Drive harder to use.
Cleaning the first screen gives you quick progress and makes the rest of the cleanup feel easier.
Step 4: Use Search and Filters to Find Groups of Files
Google Drive search can help you find files faster than scrolling.
Google says Drive offers search tools and filter chips that can narrow results by file type, people, modified date, and more.
Use this to clean one type of file at a time.
For example, search for:
“receipt”
“invoice”
“tax”
“school”
“resume”
“insurance”
“scan”
“IMG”
“screenshot”
You can also use file types to focus your cleanup.
For example:
Find PDFs and move them into document folders.
Find images and move them into Photos.
Find spreadsheets and move them into Money or Work.
Find old files by modified date and move them to Archive.
This matters because searching by theme is less stressful than browsing hundreds of mixed files.
You are not cleaning your whole Drive.
You are cleaning one group at a time.
Step 5: Rename Files That Are Hard to Understand
Many Drive folders become messy because files have unclear names.
Examples:
scan001.pdf
document-final-final.pdf
untitled.docx
IMG_4859.jpg
download.pdf
Rename important files so they explain what they are.
Better examples:
2026 Rent Agreement.pdf
2026 Health Insurance Card.pdf
2026 Tax Documents Checklist.pdf
Laptop Receipt April 2026.pdf
Emma School Form May 2026.pdf
This matters because Google Drive search works better when file names contain useful words.
You do not need to rename every old file.
Start with files you are likely to need again.
Step 6: Move Old Files to Archive
Not every old file needs to be deleted.
Some files are not active anymore, but you may want to keep them.
Create a folder called Archive.
Inside it, you can create folders such as:
- Archive 2023
- Archive 2024
- Old School Files
- Old Work Files
- Old Downloads
- Previous Computer
This matters because old files can clutter your daily workspace.
Archive keeps them out of the way without forcing you to decide whether to delete them today.
Use Archive for files that are not active but may still be useful.
Use Trash only for files you are comfortable removing.
Step 7: Check Large Files Before Deleting Small Ones
If your main problem is storage space, focus on large files first.
A few large videos can use more storage than hundreds of small documents.
Look for:
Old videos
Large photo folders
Zip files
Backups you no longer need
Duplicate uploads
Old exported files
Large PDFs
Screen recordings
This matters because deleting small documents may take a long time and free very little space.
If storage is the problem, large files give you the biggest result with the least effort.
Before deleting a large file, ask:
Do I recognize this?
Is it backed up somewhere else?
Would I need it again?
Is this the only copy?
If you are unsure, move it to Archive first or download a copy before removing it.
Step 8: Review Shared Files Carefully
Shared files can make Google Drive feel more cluttered.
Some files are owned by you.
Some files are shared with you.
Some folders belong to someone else.
Some files may be old group projects or past collaborations.
Be careful before deleting shared files.
If you own a file and delete it, other people who rely on it may lose access. Google notes that after deleting a file, people you shared it with lose access unless ownership is transferred.
This matters because shared files can affect other people.
For shared items, ask:
Do I own this file?
Does anyone else still need it?
Is it part of an active project?
Can I remove it from my view instead of deleting it?
If you are not sure, do not delete it immediately.
Move your own copy or organize it later.
Step 9: Empty Trash Only After Checking
Deleting a file usually sends it to Trash first.
Google says Drive files in Trash can be restored, and files remain in Trash for 30 days before being deleted forever.
This matters because Trash gives you a short safety window.
Do not empty Trash immediately after a big cleanup.
Wait a few days if you are unsure.
Then check Trash before permanently deleting files.
Look for file names that seem important, such as:
Tax
Lease
Insurance
Passport
School
Resume
Photos
Receipts
When you are confident, you can empty Trash to free storage. Google’s Drive help says users can permanently delete files by opening Trash and choosing Empty Trash or deleting individual files forever.
Step 10: Clean by Category, Not by Perfection
A full Drive cleanup can feel too big.
So clean by category.
Try one of these mini-cleanups:
Receipt Cleanup
Search for “receipt,” “invoice,” and “order.”
Move useful files to Receipts.
Delete duplicates only if you are sure.
School or Work Cleanup
Search for class names, project names, “resume,” “application,” or “notes.”
Move active files to School or Work.
Move old files to Archive.
Home Document Cleanup
Search for “lease,” “rent,” “mortgage,” “insurance,” “utility,” or “repair.”
Move files to Home.
Rename important files clearly.
Photo and Video Cleanup
Look for large videos, old uploads, screenshots, and duplicates.
Move important items to Photos and Videos.
Delete only what you truly do not need.
This matters because small cleanup sessions are easier to finish.
You are more likely to keep going when each session has a clear purpose.
Step 11: Make a Simple Folder Naming System
Use folder names that make sense quickly.
Good folder names:
Money
Taxes 2026
Home Insurance
School Forms
Receipts 2026
Travel Documents
Archive 2025
Less helpful names:
Stuff
Random
New Folder
Files
Important 2
Final Final
This matters because folder names are instructions for your future self.
A clear name tells you where to save the next file.
Step 12: Stop Using Google Drive as a Dumping Ground
Cleaning Google Drive once is helpful.
Changing your saving habit is what keeps it clean.
Use this simple rule:
Every new important file should go into a real folder within 24 hours.
For example:
A new bank PDF goes into Money.
A child’s school form goes into Family or School.
A home repair receipt goes into Home or Receipts.
A file you are unsure about goes into To Sort.
This matters because clutter returns when files have no landing place.
A simple habit prevents another big cleanup later.
Step 13: Back Up Important Google Drive Files
Google Drive is useful, but important files should not depend on one account only.
For very important documents, keep another backup.
This could be:
An external hard drive
A second local copy on your computer
A downloaded copy of important folders
A full home backup system
This matters because cloud storage and backup are not always the same thing.
If you accidentally delete a synced file, the change may affect more than one device.
A separate backup gives you another layer of protection.
Step 14: Make a Monthly Google Drive Reset
Once your Drive is cleaner, maintain it with a short monthly reset.
It can take 10 to 15 minutes.
During the reset:
Clear To Sort.
Move new files into folders.
Rename unclear files.
Archive old files.
Check storage.
Review Trash before emptying it.
This matters because small maintenance prevents another overwhelming cleanup.
Google Drive stays easier to use when you tidy it a little at a time.
A Simple Google Drive Cleanup Plan
Here is a beginner-friendly plan you can follow.
Day 1: Create the Folder System
Create:
- Personal Documents
- Home
- Money
- School or Work
- Photos and Videos
- Receipts
- To Sort
- Archive
Move only obvious files.
Day 2: Clean Recent Files
Sort or search for recently modified files.
Move useful recent files into the right folders.
Put unclear files in To Sort.
Day 3: Clean PDFs
Search for PDFs.
Move receipts, forms, statements, and documents into the right folders.
Rename only important files.
Day 4: Clean Photos and Videos
Look for large media files.
Keep what matters.
Archive or delete what you no longer need.
Day 5: Review Shared Files
Check shared folders and old collaborations.
Be careful with files other people still use.
Day 6: Review Trash
Check Trash before permanent deletion.
Restore anything important.
Empty Trash only when you are confident.
Day 7: Set a Monthly Reset
Pick a monthly day to clean To Sort and check storage.
This plan works because it breaks the cleanup into small, clear steps.
You do not need to finish everything in one sitting.
What to Do First Today
Start with just three actions.
Create a folder called To Sort.
Create a folder called Archive.
Move ten obvious files into better folders.
That is enough to begin.
You do not need to clean your whole Google Drive today.
A calmer Drive starts with one small decision repeated over time.
Checklist: Clean Up Google Drive Step by Step
- Do not start by deleting everything.
- Check what is using your Google account storage.
- Create a simple folder system.
- Add a temporary To Sort folder.
- Add an Archive folder for old files.
- Clean My Drive before shared files.
- Use search and filter chips to find groups of files.
- Rename important files with clear names.
- Move old files out of active folders.
- Look for large files if storage space is the problem.
- Review shared files carefully before deleting.
- Check Trash before emptying it.
- Empty Trash only when you are confident.
- Back up very important files outside Google Drive.
- Create a monthly Google Drive reset habit.
FAQ
How do I clean up Google Drive quickly?
Start by creating three folders: To Sort, Archive, and Personal Documents. Move obvious files into the right place, move old unclear files into Archive, and use search to find groups like receipts, PDFs, photos, or school files.
Should I delete files first or organize first?
Organize first. Deleting first can be stressful and may lead to mistakes. Move important files into clear folders, then delete only files you are sure you do not need.
How do I free up space in Google Drive?
Look for large files first, such as videos, zip files, old backups, and large PDFs. Also remember that Google storage is shared across Drive, Gmail, Google Photos, WhatsApp backups, and other account storage areas.
How do I find old files in Google Drive?
Use Drive search and filter chips. Google Drive can narrow searches by file type, people, modified date, and other filters.
What should I do with files I do not recognize?
Do not delete them immediately. Move them into a To Sort or Archive folder. Review them later when you have more time.
Is it safe to empty Google Drive Trash?
Only empty Trash after checking it. Files in Trash can be restored for a limited time, but once they are permanently deleted, recovery may not be possible through normal Drive controls.
Why is my Google Drive still full after deleting files?
Files in Trash may still need to be permanently deleted before space is freed. Also, your Google storage may be used by Gmail, Google Photos, WhatsApp backups, or other account storage areas, not only Drive.
How should I organize Google Drive folders?
Use broad folders such as Home, Money, School or Work, Photos and Videos, Receipts, To Sort, and Archive. Avoid too many tiny folders at the beginning.
How often should I clean Google Drive?
A short monthly cleanup is usually enough. Clear To Sort, move recent files, rename unclear documents, check storage, and review Trash.
Should I back up files outside Google Drive?
Yes, for important files. Keep another copy on an external hard drive or another backup location. Google Drive is useful, but important files are safer when they do not depend on one account only.